Nov. 8, 2008

Today I finished reading A field guide to genetic programming, a free, self published, creative commons licensed computer science book written by practitioners in the art of evolving computer programs. I say art because as the book makes clear this science is still quite young and experimental, mostly based on heuristics and rules of thumb. This is exactly what makes the book so valuable a resource. Outside the basic evolutionary algorithm the number of different ways of representing candidates, eliminating the unfit, reproducing new candidates, choosing population size, choosing mutation rate, etc. etc. make it incredibly complex to form a systematic analysis of the different aspects of the technique. The book gives experienced advice about all of these aspects and also suggests areas that need further study.

The book is ideal for people who want to get up to speed with the front line of current developments in the field. By the end of the book one is armed with enough knowledge to dive right in and start creating and using programs that evolve programs. A basic understanding of computer science concepts are all that is needed to grasp the concepts in the book, so anyone with a first year level of a computer science degree, or a few years of programming experience, should have no problem.

I purchased a hardcopy version of the book for easy reading and it came as a paper-back the size of a sheet of A5. The illustrations on the outside of the cover and througout the book lend it a lighthearted and easily comprehensible air and the writing itself is more enthusiastic than you would expect from a scientific text, making it an easy read. The examples provided are consice, easy to understand, and directly to the point, and the book is incredibly well referenced providing numerous texts to follow up some concepts in more detail.

Perhaps the most compelling feature of the book is the multitude of successful, practical applications of GP to real world problems which are found throughout it's pages. Before I read it, I was already convinced that the only way that we will evolve human equivalent intelligence will be through some type of artificial evolutionary process. Now I am even more convinced of that. Here are some choice quotes from the late Alan Turing, as always, far ahead of his time:

"There is the genetical or evolutionary search by which a combination of genes is looked for, the criterion being the survival value."

("Intelligent Machinery", Turing, 1948)

"We cannot expect to find a good child-machine at the first attempt. One must experiment with teaching one such machine and see how well it learns. One can then try another and see if it is better or worse. There is an obvious connection between this process and evolution.

'Structure of the child machine' = Hereditary material

'Changes of the child machine' = Mutation

'Natural selection' = Judgement of the experimenter"

("Computing Machinery and Intelligence", Turing, 1950)

What higher computer science accolade is there than Alan Turing's posthumous recommendation? In short, great book. Find out more at the official website and purchase it online at lulu.com.

Oct. 11, 2008

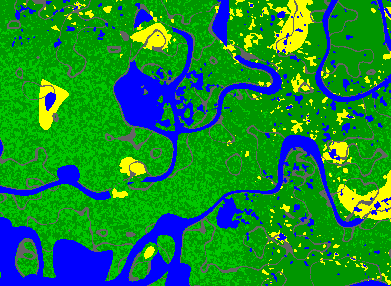
I've been re-visiting some code I wrote quite a while ago which generates a virtually infinite number of generic 2D RPG maps, with grass, sand, road, trees, and water, like this:

Perlin Noise based 2D RPG map

Here's the algorithm I have used, implemented in Python, using a Perlin Noise generator:

detail = abs(perlin.Noise2D(x / 300.0, y / 300.0))
desert1 = -perlin.Noise2D(x / 100.0, y / 100.0)
desert2 = perlin.Noise2D(x / 10.0, y / 10.0)
desertp = desert1 * detail + desert2 * (1.0 - detail)
waterp = perlin.Noise2D(x / 150.0, y / 150.0)
roadsp = (abs(perlin.Noise2D(x / 50.0, y / 50.0)))
treep = max(0, perlin.Noise2D(x / 300.0, y / 300.0)) + perlin.Noise2D(x / 3.0, y / 3.0)

oasis = desertp > 0.95
lake = desertp < -0.6
river = desert1 < 0.6 and abs(waterp) < 0.075
desert = desertp > 0.6 and desertp < 1.0 or desert1 > 0.8
roads = abs(roadsp) < 0.05
riversideRoads = desertp < 0.6 and abs(waterp) < 0.11 and abs(waterp > 0.08)
trees = treep > 1.15

if lake or river or oasis:
    DrawWater(x, y)
elif roads or riversideRoads:
    DrawRoad(x, y)
elif desert:
    DrawDesert(x, y)
elif trees:
    DrawGrass(x, y)
    DrawTrees(x, y)
else:
    DrawGrass(x, y)

One problem is that I couldn't find a decent perlin noise generator for Python that was easy to install, so I had to roll my own, and it's dog slow (apologies to any dogs who are reading this). I even tried re-implementing it as a Python extension in C but it was still only twice as fast. Psyco also did nothing to help the situation, which basically means it isn't slow because of bad optimisation but because the algorithm is very CPU intensive. The good news is that a few nights ago, while I couldn't sleep, I think I came up with a really quick way of generating random fractal based landscapes by caching the results of previous, higher order position lookups. If I'm right, it kind of turns the Perlin algorithm inside out to prevent redundant calculations. Of course, it will trade off speed for higher memory usage, but that's ok in this situation. I haven't tested my idea out yet, but hopefully I will get around to it and make my map algorithm much faster.

Another problem is that my existing maps won't wrap onto a torus without discontinuities, which means you have to have infinitely large maps for people to explore, which go on and on forever. I'd rather the maps wrapped so I could wrap them around planets and stuff. Fortunately, I think that with the judicious use of modulus operators my new algorithm should wrap pretty nicely.

Characters

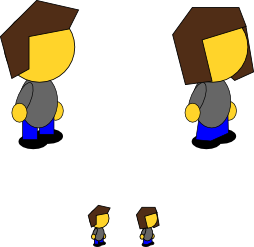
I came up with these vector art characters which I think would be suitable for a 2D RPG style game.

Vector art RPG characters

They're SVGs made in Inkscape, which is highly scriptable, so I am thinking about prototyping a character creator screen which will allow you to deck them out in different colours, clothes, accessories, etcetera, and then use Inkscape to render variations in the background.

Sept. 16, 2008

Tingangong is the onomatopoeic name for a game design that has been brewing in my head for the last few weeks since just before we left Australia. It's actually more of a non-game, or sound toy, or art game than a regular video game, but hopefully it'd still be a lot of fun to play.

Basic game idea

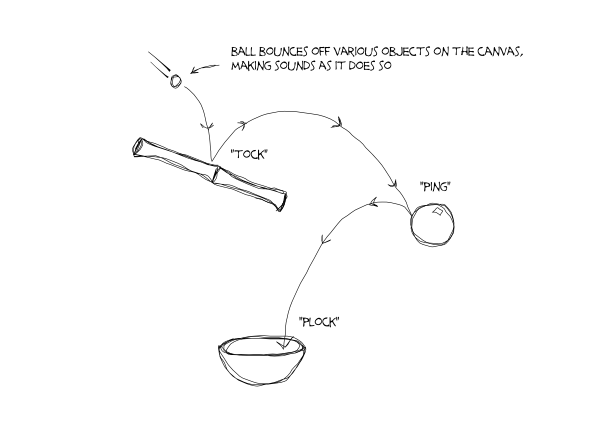
It can be summed up as a cross between the fish-and-leaves toy in Electroplankton, Crayon Physics, and The Incredible Machine. The idea is that users of the game can make "composition sculptures" by dragging various elements, each of which make a unique type of sound, onto the canvas. The sounds that each element make are triggered by tiny pinballs which are shot from cannons and bounce off the elements. Complex sculpture compositions can be set up where the balls bounce from element to element creating chains of different sounds, even music.

User Interface

User interface

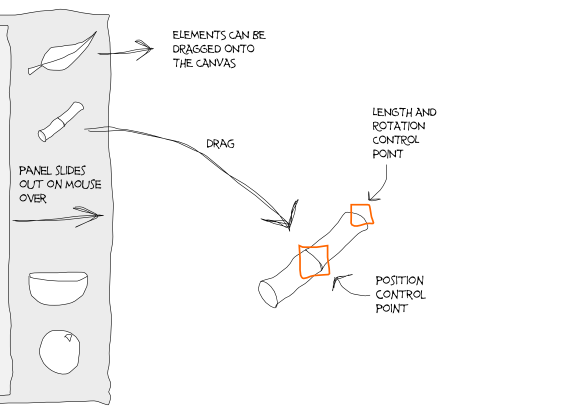
The user interface is pretty self explanatory. Mousing over the strip down the left hand side causes the panel to slide out, and then elements can be dragged off the panel and onto the canvas. There is no separate run mode vs. edit mode; the game is always running and as soon as a cannon is dragged onto the surface it will start shooting little pinballs. When the user does a mouse-over on elements that are on the canvas the control point squares appear. Clicking and dragging control points allows the user to edit the parameters of each element. For example, the piece of bamboo can be rotated, and it's length and position changed. As it is made longer the "tock" sound that the bamboo makes will become deeper. You could place several pieces of bamboo in the path of the pinball, each of varying length to create a sequence of different notes.

Ideally the canvas part of the UI would be vector graphics and hence zoomable so that you could focus in on the parts of the sculpture that you are working on, and then zoom out to see the whole thing working like clockwork. Maybe there could be a "follow ball" mode when you click on a passing pinball.

Elements

Cannon

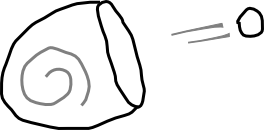
The cannon is the start of every composition as it is where the pinballs originate from. Control points allow the user to modify the position, direction and power (size) of the cannon. An additional control point allows you to change the length of the spiral at the centre of the cannon, which sets the speed at which pinballs are shot out of the cannon. This corresponds to the basic tempo of a piece of music. Different cannons can have different tempos of course.

Clock

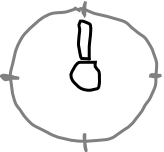
The clock has a hand which ticks with the same frequency as the nearest cannon to it. There should be some kind of visual feedback to show the user which cannon the clock is associated with. Pinballs bounce off the hand of the clock and this allows you to create pieces where pinballs go in multiple directions at different times. The clock features control points for changing the length of the hand, the position and rotation of the clock, and the number of stops on the clock's face. It might be a good idea to try having a separate spiral to control the tempo of the clock independently of any cannon. Testing will reveal which method is more intuitive and useful.

Hit clock

The hit clock is just like the clock, except that it only 'ticks' when a pinball strikes the centre circle. Other than that it has pretty much the same control points for size, rotation, position, and number of stops. This allows you to create more complex pieces where a ball can strike a hit-clock after a long sequence to change the direction and flow of other pinballs.

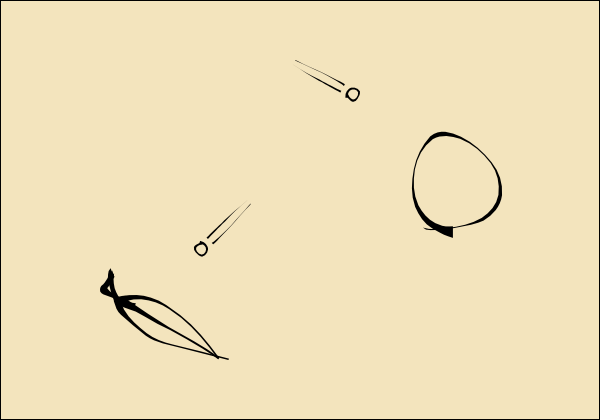
Leaf

The leaf is inspired by the leaves in the Electroplankton fish-and-leaves game - it makes a plucked string sound when the stem of the leaf is struck by a pinball. The control points on the leaf allow you to change the length, rotation and position of the leaf. The length of the leaf changes the taughtness, or pitch of the string. The sound for the leaf should vary in a procedural way if it has multiple excitations in rapid succession, which goes the same for the following audible elements. An algorithm such as the Karplus-strong algorithm would work well for the the leaf, and is faily easily implemented.

Bowl

The bowl contains water and makes a 'plock' sound when pinballs fall into it, and a gongish sound when struck on the sides. The bowl's position, width, and height can be changed with control points. It's width corresponds to the pitch of the 'plock' sound, and the height determines how much reverb to put on the sound. Both the width and the height determine the pitch of the gong sound that the sides of the bowl make; each might determine the pitch of one of two oscillators which are ring-modulated together.

Bamboo

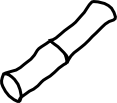
The bamboo makes a 'tock' sound when struck by a pinball and has control points for position, rotation, width, and length. The length of the piece of bamboo determines the pitch of the tock sound, and the width determines the depth, or length of the sound.

Sphere

The sphere makes a 'ting' sound like a single bar from a wind chime. The control points allow you to modify the position and size of the sphere, with the size corresponding to the pitch of the chime.

Aesthetic

Aesthetic of the game

In my head the game looks like a piece of traditional japanese calligraphy (above is my pretty lame attempt at that look) and the scupltures are tinkly pretty things which sound like gamelan music, or John Cage's "Six Marimbas". I can imagine users creating fully fledged pieces with multiple parts and movements which sound as fascinating and wonderful as they look.

Technology

If I was to code up this game or a prototype thereof tommorrow (it could happen!), I would use the following combination of technologies:

  • The core engine would be written in Python for speed of prototyping.
  • The graphical component of the engine would be implemented in Pygame or Pyglet, or maybe Pycairo for the vector graphic component if it's fast and cross platform enough.
  • The physics engine would be Box2d, Chipmunk, ODE, or something similarly cross-platform and Python compatible.
  • The audio backend would be implemented in Pure Data. It would be launched as a subprocess and would use the '-nogui' flag and sockets/pipes to communicate with the Python based front-end. Individual elements would each have their own Pure Data abstraction, and dynamic patching would be used to create instances of each element. Incidentally, Pd is the music engine for the recently released vide game, Spore.

All these technologies can be googled for more info.

Concluding

Some good community features such as uploading and sharing sculpture compositions would be nice, and png-embedded data files could be cool as well, so that images could be dragged from a browser into the game and loaded up instantly, and users could easily share compositions by sharing screenshots. Another cool feature might be to have elements that are touching eachother on the canvas have some kind of audio interplay such as ring-modulation between the two sounds. That kind of stuff should be experimented with after the basic prototype of the game is up and running.

Aug. 11, 2008

Update: the article below is for an Inkscape extension I built a while back for doing animation. For a newer and much better solution for doing frame-by-frame animation in both Inkscape and Adobe Illustrator check out SVG Flipbook. Enjoy!

Inkscape is an awesome, free and open source vector graphics program. It's the free world's version of Adobe's Illustrator program. I can't comment on whether it's better or worse since I've never used Illustrator, but there are many things to love about Inkscape and it's very capable when it comes to vector graphics.

One thing that is hard to come by is a good, free and open source vector animation program. The Inkscape website says that they are looking at introducing animation into the program some time in the future, but who knows how long that will take. I needed to make animated vector graphics for my GameJam 0808 entry, which is a vector graphics platformer, so I knocked together a quick script to do layer based animation in Inkscape. Luckily Inkscape's extensions system is quite extensible, so I was able to write a small Python script that renders each layer separately using Inkscape itself, and then uses Imagemagick's "convert" program to mash the layers together into an animated GIF. Finally, the extension automatically launches the default browser to display the result. This currently only works under GNU/Linux systems with Imagemagick installed, but I'm sure it wouldn't be too big a stretch to get it working on other operating systems.

Here is the Inkscape extension XML file. Place this in your .inkscape/extensions/ directory in a file called gifanimate.inx:

<inkscape-extension>
  <_name>GIF Animate</_name>
  <id>org.ekips.filter.GIFAnimate</id>
  <dependency type="executable" location="extensions">gifanimate.py</dependency>
  <dependency type="executable" location="extensions">inkex.py</dependency>
  <!-- <param name="what" type="string" _gui-text="What would you like to greet?">World</param> -->
  <effect>
    <object-type>all</object-type>
    <effects-menu>
       <submenu _name="Animate"/>
    </effects-menu>
  </effect>
  <script>
    <command reldir="extensions" interpreter="python">gifanimate.py</command>
  </script>
</inkscape-extension>

Here is the Python script that does all the work. Put this in the same place, and name it 'gifanimate.py'.

#!/usr/bin/env python
import sys, os
sys.path.append('/usr/share/inkscape/extensions')

import inkex
from simplestyle import *

class GIFAnimate(inkex.Effect):
    def __init__(self):
        inkex.Effect.__init__(self)

    def effect(self):
        infile = sys.argv[-1]

        # Get access to main SVG document element and get its dimensions.
        from xml.dom.minidom import parse, parseString
        dom = parse(infile)
        svg = dom.getElementsByTagName('svg')[0]

        layers = svg.getElementsByTagName('g')
        pngcommand = "inkscape %s -C -i '%s' -j -e /tmp/%s.png 2>&1 > /dev/null"

        layerids = []
        delays = []
        for l in layers:
            bits = l.getAttribute('inkscape:label').split("#")
            if not "ignore" in bits:
                layerids.append(l.getAttribute('id'))
                delays.append(bits[0])

        [os.system(pngcommand % (infile, id, id)) for id in layerids]
        bits = " ".join(["-delay %d /tmp/%s.png" % (int(delays[x]), layerids[x]) for x in range(len(layerids))])
        gifcmd = "convert -loop 0 " + bits + " /tmp/inkscape-anim.gif"
        os.system(gifcmd)
        import webbrowser
        webbrowser.open("file:///tmp/inkscape-anim.gif")

# Create effect instance and apply it.
effect = GIFAnimate()
effect.affect()

To use it go to the 'effects' menu and choose 'Animate > GIF Animate'. Specify frame lengths (in milliseconds) by renaming the layer to the length of time that you'd like each frame to last. Inkscape will add a hash followed by a number for each duplicate entry, but my script will ignore that.

Main character walkcycle

Have fun!

Aug. 4, 2008

Recursive Dimensional Clustering is a fast algorithm for finding collisions and clusters in sets of data. It scales well from one dimension upwards, making it appropriate for high dimensional scientific applications as well as the obvious application in 2d and 3d games. The algorithm first appeared in the book Game Programming Gems 2 in an entry by Steve Rabin. There is a lot more info and an interactive Flash implementation on this page.

I took the code from Polygonal Laboratory and ported it to Javascript, and then later I took that implementation and ported it to Python. I like to think that my implementation is quite clean, and scalable up to many dimensions with very little effort. It's also fast, as you will see from the demo, detecting about 26 collisions amongst 100 objects per frame at 90 frames per second on my sub-2Ghz dual core machine.

To use it, the programmer needs to inherit the main RDCEntity class and supply 'axis function' methods which return the min and max bounds of the entity in each dimension or axis. The resulting class will have the 'Collide' method called whenever it collides with another entity, and the 'SetGroup' method called when it is detected to be part of a group; see the Polygonal Labs post for more info about what these terms relate to. Note that this does simple axis-aligned bounding-box collisions. If you want more complicated collisions you could use RDC to narrow down which polys are potentially colliding, and then use a poly-poly collision function to see if they're actually colliding. Another approach is to use RDC with multiple bounding boxes per entity. Put the three Python classes below into a file called 'RDC.py' to use them.

The first class represents a 'Boundary' which is what the RDC algorithm uses to determine if things are overlapping in a particular dimension or not. Boundaries are either 'open' (leading edge) or 'closed' (trailing edge).

class Boundary:
    def __init__(self, type, position, obj):
        self.type = type
        self.position = position
        self.obj = obj

The next class is the RDCEntity class which the programmer needs to inherit from in order to run the RDC algorithm on their own game entities.

class RDCEntity:
    """
    Base class you should override to make things which are RDC collideable.

    axisFns is a list of dimension bounding axis conditions.
    These must be methods which return the values of each bound on a particular axis for this entity.
    """
    axisFns = [["GetLeft", "GetRight"], ["GetTop", "GetBottom"]]

    def Collide(self, who):
        """
        'who' is the other entity who we collided with.
        """

    def SetGroup(self, group, friends):
        """
        Set the group identifier number that we are part of.
        group is the integer ID.
        friends is a list of friends in my collision group.
        """

    ##################
    # Axis functions #
    ##################

    def GetLeft(self):
        """
        Example axis function which returns the left bound on the x axis.
        """

The next class makes up the bulk of the actual algorithm. It finds collisions and groups amongst entities. Call it with the DoRDC() method.

class RDC:
    def __init__(self, entityClass):
        # Array of functions that contain the sort and position functions for each axis
        self.axisFns = entityClass.axisFns
        # which axis we are currently checking on in this pass
        self.idx = 0
        # test if there has been a division or not
        self.divided = True

    def DoSort(self, clusters, axis):
        # we're going to replace all clusters with new found ones
        newclusters = []
        # assume that we won't divide any further
        self.divided = False

        # for every sub cluster in our group of clusters
        for c in clusters:
            boundaries = []
            count = 0
            group = []

            # store the intervals for a given axis in a list data structure
            for obj in c:
                boundaries.append(Boundary('o', getattr(obj, axis[0])(), obj))
                boundaries.append(Boundary('c', getattr(obj, axis[1])(), obj))

            # sort our list of all boundaries on position
            boundaries.sort(lambda a, b: cmp(a.position, b.position))

            # finally, make new chunks out of our existing collection
            for i in xrange(len(boundaries)):
                b = boundaries[i]
                # if we find a leading edge, increment our count
                # and push it onto our stack of the current group
                if b.type == "o":
                    count += 1
                    group.append(b.obj)
                elif b.type == "c":
                    count -= 1
                    # if we have finished finding a group
                    # push this group onto the stack on new clusters
                    # empty out our group
                    if count == 0:
                        newclusters.append(group)
                        group = []
                        # if we're not at the very end of our array then we've just made a new subdivision
                        if i != len(boundaries) - 1:
                            self.divided = True

        return newclusters

    def FindGroups(self, group):
        clusters = [group]
        while (self.divided):
            # find the new clusters
            clusters = self.DoSort(clusters, self.axisFns[self.idx])
            # select the next axis for subdivision
            self.idx = (self.idx + 1) % len(self.axisFns)
        return clusters

    def DoRDC(self, entities):
        groups = self.FindGroups(entities)
        for g in xrange(len(groups)):
            # Do collision callbacks - test each entity against others in their group
            self.BruteForceRectangles(groups[g])
            # set which group each entity belongs to
            # pass in group friends
            [d.SetGroup(g, groups[g]) for d in groups[g]]

    def BruteForceRectangles(self, group):
        """
        Bruteforce collision detection.
        Pass in an array of objects, and an array that looks like this:
        [[leading1, trailing1], [leading2, trailing2], [leading3, trailing3]...]

        leading1 is the function that returns the leading edge of an axis bounding box.
        trailing1 is the function that returns the trailing edge of an axis bounding box.
        """
        for i in xrange(len(group)):
            for j in xrange(i + 1, len(group)):
                collided = True
                for a in self.axisFns:
                    if (getattr(group[i], a[0])() > getattr(group[j], a[1])()):
                        collided = False
                    if (getattr(group[j], a[0])() > getattr(group[i], a[1])()):
                        collided = False

                if collided:
                    group[i].Collide(group[j])
                    group[j].Collide(group[i])

I tried running the same code without the 'getattr' function, which gets called many times each frame, but I didn't notice any particular speedup so I think it's fine to leave that in there as it makes the code cleaner and more flexible.

Finally here is some test code that uses pygame to showcase the RDC code above. You can save it in a file called testRDC.py for example, and then run it. You will see it processing collisions between 100 random squares as fast as possible. You can click on the window to pause the simulation and examine an example frame; squares of the same colour are in a group/cluster together, whilst squares with a red border are actually colliding.

from random import random, randint
from time import time
from sys import argv, exit
from os import environ
import pygame

from RDC import *

SCREENSIZE = (640, 480)

collisions = 0

class Square(RDCEntity):
    def __init__(self):
        self.color = [100, 100, 100]
        self.border = [0, 0, 0]
        self.width = 20
        self.height = 20
        self.left = random() * (SCREENSIZE[0] - self.width)
        self.top = random() * (SCREENSIZE[1] - self.height)

    # if we collide with someone
    def Collide(self, who):
        self.border = [255, 0, 0]
        global collisions
        collisions += 1

    def SetGroup(self, g, friends):
        self.color = [(g * 10) % 255, ((g - 50) * 35) % 255, (g * -15) % 255]

    # functions for returning bounding box sides
    def GetLeft(self):
        return self.left

    def GetRight(self):
        return self.left + self.width

    def GetTop(self):
        return self.top

    def GetBottom(self):
        return self.top + self.height

environ['SDL_VIDEO_CENTERED'] = '1'
pygame.init()
screen = pygame.display.set_mode(SCREENSIZE)

pygame.font.init()
fnt = pygame.font.SysFont("Arial", 12)
many = len(argv) > 1 and int(argv[1]) or 100
pause = False
frames = 0
total = 0

while True:
    for event in pygame.event.get():
        if event.type == pygame.QUIT or event.type == pygame.KEYDOWN:
            exit()

        if event.type == pygame.MOUSEBUTTONDOWN:
            pause = not pause

    if not pause:
        squares = [Square() for s in range(many)]
        start = time()
        rdc = RDC(RDCEntity).DoRDC(squares)
        elapse = int(1 / (time() - start))
        total += elapse
        frames += 1

    txt = fnt.render(str("%d objects collided an average of %d times at %d fps" % (many, collisions / frames / 2, total / frames)), 1, (0, 0, 0))

    screen.fill([255, 255, 255])
    [pygame.draw.rect(screen, s.color, (s.left, s.top, s.width, s.height), 0) for s in squares]
    [pygame.draw.rect(screen, s.border, (s.left, s.top, s.width, s.height), 1) for s in squares]
    screen.blit(txt, (10, 10))
    pygame.display.flip()

For interest's sake, below is my earlier Javascript implementation of the same code. Email me for a test HTML file that uses this code:

/* 
    Recursive dimensional clustering

    Pass in an array that looks like this:
    [[leading1, trailing1], [leading2, trailing2], [leading3, trailing3]...]

    leading1 is the function that returns the leading edge of an axis bounding box.
    trailing1 is the function that returns the trailing edge of an axis bounding box.
*/
PodSix.RDC = function(axisFunctions)
{
    // Array of functions that contain the sort and position functions for each axis
    this.axisFns = axisFunctions;
    // which axis we are currently checking on in this pass
    this.idx = 0;
    // test if there has been a division or not
    this.divided = true;

    var Boundary = function(type, position, obj)
    {
        this.type = type;
        this.position = position;
        this.obj = obj;
    }

    this.DoSort = function(clusters, axis)
    {
        // we're going to replace all clusters with new found ones
        var newclusters = [];
        // assume that we won't divide any further
        this.divided = false;

        // for every sub cluster in our group of clusters
        for (c in clusters)
        {
            var boundaries = [];
            var count = 0;
            var group = [];

            // store the intervals for a given axis in a list data structure
            for (i in clusters[c])
            {
                obj = clusters[c][i];
                boundaries.push(new Boundary('o', obj[axis[0]](), obj));
                boundaries.push(new Boundary('c', obj[axis[1]](), obj));
                debug.innerHTML += obj[axis[0]]() +"," + obj[axis[1]]() + "</br>";
            }

            // sort our list of all boundaries on position
            boundaries.sort(function(a, b) { return a.position - b.position });

            // finally, make new chunks out of our existing collection
            for (i = 0; i < boundaries.length; i++)
            {
                b = boundaries[i];
                // if we find a leading edge, increment our count
                // and push it onto our stack of the current group
                if (b.type == "o")
                {
                    count++;
                    group.push(b.obj);
                }
                else if (b.type == "c")
                {
                    count--;
                    // if we have finished finding a group
                    // push this group onto the stack on new clusters
                    // empty out our group
                    if (count == 0)
                    {
                        newclusters.push(group);
                        group = [];
                        // if we're not at the very end of our array then we've just made a new subdivision
                        if (i != boundaries.length - 1)
                        {
                            this.divided = true;
                        }
                    }
                }
            }
        }

        return newclusters;
    }

    this.FindGroups = function(group)
    {
        var clusters = [group];
        while (this.divided)
        {
            // find the new clusters
            clusters = this.DoSort(clusters, this.axisFns[this.idx]);
            // select the next axis for subdivision
            this.idx = (this.idx + 1) % this.axisFns.length;
        }
        return clusters;
    }
}

/*
    Bruteforce collision detection.
    Pass in an array of objects, and an array that looks like this:
    [[leading1, trailing1], [leading2, trailing2], [leading3, trailing3]...]

    leading1 is the function that returns the leading edge of an axis bounding box.
    trailing1 is the function that returns the trailing edge of an axis bounding box.
*/
PodSix.BruteForceRectangles = function(group, axisFns)
{
    for (var i = 0; i < group.length; i++)
    {
        for (var j = i + 1; j < group.length; j++)
        {
            collided = true;
            for (a in axisFns)
            {
                if (group[i][axisFns[a][0]]() > group[j][axisFns[a][1]]()) collided = false;
                if (group[j][axisFns[a][0]]() > group[i][axisFns[a][1]]()) collided = false;
            }

            if (collided)
            {
                group[i].Collide(group[j]);
                group[j].Collide(group[i]);
            }
        }
    }
}