Aug. 11, 2008

Update: the article below is for an Inkscape extension I built a while back for doing animation. For a newer and much better solution for doing frame-by-frame animation in both Inkscape and Adobe Illustrator check out SVG Flipbook. Enjoy!

Inkscape is an awesome, free and open source vector graphics program. It's the free world's version of Adobe's Illustrator program. I can't comment on whether it's better or worse since I've never used Illustrator, but there are many things to love about Inkscape and it's very capable when it comes to vector graphics.

One thing that is hard to come by is a good, free and open source vector animation program. The Inkscape website says that they are looking at introducing animation into the program some time in the future, but who knows how long that will take. I needed to make animated vector graphics for my GameJam 0808 entry, which is a vector graphics platformer, so I knocked together a quick script to do layer based animation in Inkscape. Luckily Inkscape's extensions system is quite extensible, so I was able to write a small Python script that renders each layer separately using Inkscape itself, and then uses Imagemagick's "convert" program to mash the layers together into an animated GIF. Finally, the extension automatically launches the default browser to display the result. This currently only works under GNU/Linux systems with Imagemagick installed, but I'm sure it wouldn't be too big a stretch to get it working on other operating systems.

Here is the Inkscape extension XML file. Place this in your .inkscape/extensions/ directory in a file called gifanimate.inx:

<inkscape-extension>
  <_name>GIF Animate</_name>
  <id>org.ekips.filter.GIFAnimate</id>
  <dependency type="executable" location="extensions">gifanimate.py</dependency>
  <dependency type="executable" location="extensions">inkex.py</dependency>
  <!-- <param name="what" type="string" _gui-text="What would you like to greet?">World</param> -->
  <effect>
    <object-type>all</object-type>
    <effects-menu>
       <submenu _name="Animate"/>
    </effects-menu>
  </effect>
  <script>
    <command reldir="extensions" interpreter="python">gifanimate.py</command>
  </script>
</inkscape-extension>

Here is the Python script that does all the work. Put this in the same place, and name it 'gifanimate.py'.

#!/usr/bin/env python
import sys, os
sys.path.append('/usr/share/inkscape/extensions')

import inkex
from simplestyle import *

class GIFAnimate(inkex.Effect):
    def __init__(self):
        inkex.Effect.__init__(self)

    def effect(self):
        infile = sys.argv[-1]

        # Get access to main SVG document element and get its dimensions.
        from xml.dom.minidom import parse, parseString
        dom = parse(infile)
        svg = dom.getElementsByTagName('svg')[0]

        layers = svg.getElementsByTagName('g')
        pngcommand = "inkscape %s -C -i '%s' -j -e /tmp/%s.png 2>&1 > /dev/null"

        layerids = []
        delays = []
        for l in layers:
            bits = l.getAttribute('inkscape:label').split("#")
            if not "ignore" in bits:
                layerids.append(l.getAttribute('id'))
                delays.append(bits[0])

        [os.system(pngcommand % (infile, id, id)) for id in layerids]
        bits = " ".join(["-delay %d /tmp/%s.png" % (int(delays[x]), layerids[x]) for x in range(len(layerids))])
        gifcmd = "convert -loop 0 " + bits + " /tmp/inkscape-anim.gif"
        os.system(gifcmd)
        import webbrowser
        webbrowser.open("file:///tmp/inkscape-anim.gif")

# Create effect instance and apply it.
effect = GIFAnimate()
effect.affect()

To use it go to the 'effects' menu and choose 'Animate > GIF Animate'. Specify frame lengths (in milliseconds) by renaming the layer to the length of time that you'd like each frame to last. Inkscape will add a hash followed by a number for each duplicate entry, but my script will ignore that.

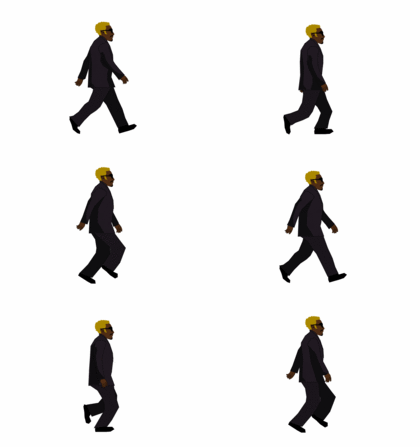
Main character walkcycle

Have fun!

Aug. 5, 2008

A few weeks back my friend Simon came up with the great idea of doing a game jam here in Perth. A game jam is where a bunch of people make teams and try to develop full games in a time limited situation. Similar competitions are Ludum Dare, and Pyweek. They are a lot of fun, and you tend to get lots of code and experience out of it.

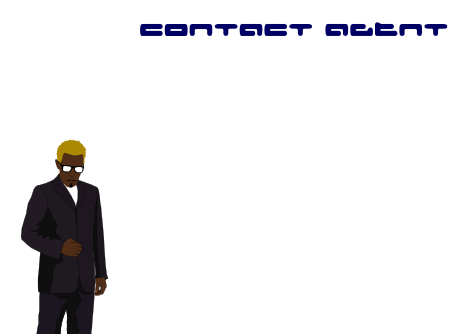
This is the tenative title, and main character, from my entry into the competition:

Contact Agent - my game

Anyway, Simon built this cool community site in a matter of days using Pylons, which you can see at http://gamejam.org/ and then we put out the word on the internets, and now we are in the midst of it, with eleven days left to go. The turnout has been pretty superb and I am looking forward to seeing everyone's finished projects. The competition is very loose; you can use any engine you want and pretty much do any kind of game you want, as long as you use the 'significant asset' in your game. Also, it isn't really limited to Perth only and it only just started not long ago, so if you have a hankering to develop a game idea then this is the forum for you; go ahead and join the fray!

My own game is a vector graphics platformer. I think I'll probably get all the code done in time with a basic playable game, but I'm not so sure about getting it deployed onto all platforms. We'll see, I guess!

We'll almost certainly do more game jams in future months. Can't wait.

Aug. 4, 2008

Recursive Dimensional Clustering is a fast algorithm for finding collisions and clusters in sets of data. It scales well from one dimension upwards, making it appropriate for high dimensional scientific applications as well as the obvious application in 2d and 3d games. The algorithm first appeared in the book Game Programming Gems 2 in an entry by Steve Rabin. There is a lot more info and an interactive Flash implementation on this page.

I took the code from Polygonal Laboratory and ported it to Javascript, and then later I took that implementation and ported it to Python. I like to think that my implementation is quite clean, and scalable up to many dimensions with very little effort. It's also fast, as you will see from the demo, detecting about 26 collisions amongst 100 objects per frame at 90 frames per second on my sub-2Ghz dual core machine.

To use it, the programmer needs to inherit the main RDCEntity class and supply 'axis function' methods which return the min and max bounds of the entity in each dimension or axis. The resulting class will have the 'Collide' method called whenever it collides with another entity, and the 'SetGroup' method called when it is detected to be part of a group; see the Polygonal Labs post for more info about what these terms relate to. Note that this does simple axis-aligned bounding-box collisions. If you want more complicated collisions you could use RDC to narrow down which polys are potentially colliding, and then use a poly-poly collision function to see if they're actually colliding. Another approach is to use RDC with multiple bounding boxes per entity. Put the three Python classes below into a file called 'RDC.py' to use them.

The first class represents a 'Boundary' which is what the RDC algorithm uses to determine if things are overlapping in a particular dimension or not. Boundaries are either 'open' (leading edge) or 'closed' (trailing edge).

class Boundary:
    def __init__(self, type, position, obj):
        self.type = type
        self.position = position
        self.obj = obj

The next class is the RDCEntity class which the programmer needs to inherit from in order to run the RDC algorithm on their own game entities.

class RDCEntity:
    """
    Base class you should override to make things which are RDC collideable.

    axisFns is a list of dimension bounding axis conditions.
    These must be methods which return the values of each bound on a particular axis for this entity.
    """
    axisFns = [["GetLeft", "GetRight"], ["GetTop", "GetBottom"]]

    def Collide(self, who):
        """
        'who' is the other entity who we collided with.
        """

    def SetGroup(self, group, friends):
        """
        Set the group identifier number that we are part of.
        group is the integer ID.
        friends is a list of friends in my collision group.
        """

    ##################
    # Axis functions #
    ##################

    def GetLeft(self):
        """
        Example axis function which returns the left bound on the x axis.
        """

The next class makes up the bulk of the actual algorithm. It finds collisions and groups amongst entities. Call it with the DoRDC() method.

class RDC:
    def __init__(self, entityClass):
        # Array of functions that contain the sort and position functions for each axis
        self.axisFns = entityClass.axisFns
        # which axis we are currently checking on in this pass
        self.idx = 0
        # test if there has been a division or not
        self.divided = True

    def DoSort(self, clusters, axis):
        # we're going to replace all clusters with new found ones
        newclusters = []
        # assume that we won't divide any further
        self.divided = False

        # for every sub cluster in our group of clusters
        for c in clusters:
            boundaries = []
            count = 0
            group = []

            # store the intervals for a given axis in a list data structure
            for obj in c:
                boundaries.append(Boundary('o', getattr(obj, axis[0])(), obj))
                boundaries.append(Boundary('c', getattr(obj, axis[1])(), obj))

            # sort our list of all boundaries on position
            boundaries.sort(lambda a, b: cmp(a.position, b.position))

            # finally, make new chunks out of our existing collection
            for i in xrange(len(boundaries)):
                b = boundaries[i]
                # if we find a leading edge, increment our count
                # and push it onto our stack of the current group
                if b.type == "o":
                    count += 1
                    group.append(b.obj)
                elif b.type == "c":
                    count -= 1
                    # if we have finished finding a group
                    # push this group onto the stack on new clusters
                    # empty out our group
                    if count == 0:
                        newclusters.append(group)
                        group = []
                        # if we're not at the very end of our array then we've just made a new subdivision
                        if i != len(boundaries) - 1:
                            self.divided = True

        return newclusters

    def FindGroups(self, group):
        clusters = [group]
        while (self.divided):
            # find the new clusters
            clusters = self.DoSort(clusters, self.axisFns[self.idx])
            # select the next axis for subdivision
            self.idx = (self.idx + 1) % len(self.axisFns)
        return clusters

    def DoRDC(self, entities):
        groups = self.FindGroups(entities)
        for g in xrange(len(groups)):
            # Do collision callbacks - test each entity against others in their group
            self.BruteForceRectangles(groups[g])
            # set which group each entity belongs to
            # pass in group friends
            [d.SetGroup(g, groups[g]) for d in groups[g]]

    def BruteForceRectangles(self, group):
        """
        Bruteforce collision detection.
        Pass in an array of objects, and an array that looks like this:
        [[leading1, trailing1], [leading2, trailing2], [leading3, trailing3]...]

        leading1 is the function that returns the leading edge of an axis bounding box.
        trailing1 is the function that returns the trailing edge of an axis bounding box.
        """
        for i in xrange(len(group)):
            for j in xrange(i + 1, len(group)):
                collided = True
                for a in self.axisFns:
                    if (getattr(group[i], a[0])() > getattr(group[j], a[1])()):
                        collided = False
                    if (getattr(group[j], a[0])() > getattr(group[i], a[1])()):
                        collided = False

                if collided:
                    group[i].Collide(group[j])
                    group[j].Collide(group[i])

I tried running the same code without the 'getattr' function, which gets called many times each frame, but I didn't notice any particular speedup so I think it's fine to leave that in there as it makes the code cleaner and more flexible.

Finally here is some test code that uses pygame to showcase the RDC code above. You can save it in a file called testRDC.py for example, and then run it. You will see it processing collisions between 100 random squares as fast as possible. You can click on the window to pause the simulation and examine an example frame; squares of the same colour are in a group/cluster together, whilst squares with a red border are actually colliding.

from random import random, randint
from time import time
from sys import argv, exit
from os import environ
import pygame

from RDC import *

SCREENSIZE = (640, 480)

collisions = 0

class Square(RDCEntity):
    def __init__(self):
        self.color = [100, 100, 100]
        self.border = [0, 0, 0]
        self.width = 20
        self.height = 20
        self.left = random() * (SCREENSIZE[0] - self.width)
        self.top = random() * (SCREENSIZE[1] - self.height)

    # if we collide with someone
    def Collide(self, who):
        self.border = [255, 0, 0]
        global collisions
        collisions += 1

    def SetGroup(self, g, friends):
        self.color = [(g * 10) % 255, ((g - 50) * 35) % 255, (g * -15) % 255]

    # functions for returning bounding box sides
    def GetLeft(self):
        return self.left

    def GetRight(self):
        return self.left + self.width

    def GetTop(self):
        return self.top

    def GetBottom(self):
        return self.top + self.height

environ['SDL_VIDEO_CENTERED'] = '1'
pygame.init()
screen = pygame.display.set_mode(SCREENSIZE)

pygame.font.init()
fnt = pygame.font.SysFont("Arial", 12)
many = len(argv) > 1 and int(argv[1]) or 100
pause = False
frames = 0
total = 0

while True:
    for event in pygame.event.get():
        if event.type == pygame.QUIT or event.type == pygame.KEYDOWN:
            exit()

        if event.type == pygame.MOUSEBUTTONDOWN:
            pause = not pause

    if not pause:
        squares = [Square() for s in range(many)]
        start = time()
        rdc = RDC(RDCEntity).DoRDC(squares)
        elapse = int(1 / (time() - start))
        total += elapse
        frames += 1

    txt = fnt.render(str("%d objects collided an average of %d times at %d fps" % (many, collisions / frames / 2, total / frames)), 1, (0, 0, 0))

    screen.fill([255, 255, 255])
    [pygame.draw.rect(screen, s.color, (s.left, s.top, s.width, s.height), 0) for s in squares]
    [pygame.draw.rect(screen, s.border, (s.left, s.top, s.width, s.height), 1) for s in squares]
    screen.blit(txt, (10, 10))
    pygame.display.flip()

For interest's sake, below is my earlier Javascript implementation of the same code. Email me for a test HTML file that uses this code:

/* 
    Recursive dimensional clustering

    Pass in an array that looks like this:
    [[leading1, trailing1], [leading2, trailing2], [leading3, trailing3]...]

    leading1 is the function that returns the leading edge of an axis bounding box.
    trailing1 is the function that returns the trailing edge of an axis bounding box.
*/
PodSix.RDC = function(axisFunctions)
{
    // Array of functions that contain the sort and position functions for each axis
    this.axisFns = axisFunctions;
    // which axis we are currently checking on in this pass
    this.idx = 0;
    // test if there has been a division or not
    this.divided = true;

    var Boundary = function(type, position, obj)
    {
        this.type = type;
        this.position = position;
        this.obj = obj;
    }

    this.DoSort = function(clusters, axis)
    {
        // we're going to replace all clusters with new found ones
        var newclusters = [];
        // assume that we won't divide any further
        this.divided = false;

        // for every sub cluster in our group of clusters
        for (c in clusters)
        {
            var boundaries = [];
            var count = 0;
            var group = [];

            // store the intervals for a given axis in a list data structure
            for (i in clusters[c])
            {
                obj = clusters[c][i];
                boundaries.push(new Boundary('o', obj[axis[0]](), obj));
                boundaries.push(new Boundary('c', obj[axis[1]](), obj));
                debug.innerHTML += obj[axis[0]]() +"," + obj[axis[1]]() + "</br>";
            }

            // sort our list of all boundaries on position
            boundaries.sort(function(a, b) { return a.position - b.position });

            // finally, make new chunks out of our existing collection
            for (i = 0; i < boundaries.length; i++)
            {
                b = boundaries[i];
                // if we find a leading edge, increment our count
                // and push it onto our stack of the current group
                if (b.type == "o")
                {
                    count++;
                    group.push(b.obj);
                }
                else if (b.type == "c")
                {
                    count--;
                    // if we have finished finding a group
                    // push this group onto the stack on new clusters
                    // empty out our group
                    if (count == 0)
                    {
                        newclusters.push(group);
                        group = [];
                        // if we're not at the very end of our array then we've just made a new subdivision
                        if (i != boundaries.length - 1)
                        {
                            this.divided = true;
                        }
                    }
                }
            }
        }

        return newclusters;
    }

    this.FindGroups = function(group)
    {
        var clusters = [group];
        while (this.divided)
        {
            // find the new clusters
            clusters = this.DoSort(clusters, this.axisFns[this.idx]);
            // select the next axis for subdivision
            this.idx = (this.idx + 1) % this.axisFns.length;
        }
        return clusters;
    }
}

/*
    Bruteforce collision detection.
    Pass in an array of objects, and an array that looks like this:
    [[leading1, trailing1], [leading2, trailing2], [leading3, trailing3]...]

    leading1 is the function that returns the leading edge of an axis bounding box.
    trailing1 is the function that returns the trailing edge of an axis bounding box.
*/
PodSix.BruteForceRectangles = function(group, axisFns)
{
    for (var i = 0; i < group.length; i++)
    {
        for (var j = i + 1; j < group.length; j++)
        {
            collided = true;
            for (a in axisFns)
            {
                if (group[i][axisFns[a][0]]() > group[j][axisFns[a][1]]()) collided = false;
                if (group[j][axisFns[a][0]]() > group[i][axisFns[a][1]]()) collided = false;
            }

            if (collided)
            {
                group[i].Collide(group[j]);
                group[j].Collide(group[i]);
            }
        }
    }
}

July 22, 2008

weewar.com

The most important question you can ask about a video game is "is it fun?" In the case of WeeWar the answer is yes. With cute graphics and simple multiplayer gameplay, it's implemented in pure Javascript and HTML with no proprietary Flash plugin in sight. This is exactly the kind of cross platform, multiplayer, casual game we need to see more of. This game will do fantastically well because it's done everything just right.

July 17, 2008

This page hosts an excellent example of gesture/writing recognition implemented in pure Javascript. The author has a blog post here with more information about his implementation. The algorithm presented works fantastically on the web and if you follow the gestures in the PDF you will find it gets good accuracy even with clumsy, mouse-drawn lines. Even better, the source code is compact and quite clear. Inspired by the simplicity of the algorithm and the small size of the code, I ported it to pure Python. Lately I have been thinking a lot about Jython and Python on the Nintendo DS, and so I've kept the module clean and hopefully very portable with no dependencies on other libraries, and only one small dependency on a Python built-in library. I've also tried to remain dimensionally agnostic where possible, meaning that you should be able to detect 'gestures' in any kind of data of any dimensionality (3d movements, musical pitches, whatever) with a little tweaking. See below for the full source code listing. Copy the first three bits of code and paste them into a file called OneStrokeGesture.py(.) The last couples of bits of code are demos, which require the pygame library.

First up is the Path class. This class holds a single drawn line and is what is created when raw point data is passed to the library. The Path class requires the only dependency of this module, which is the sqrt function from the standard math library included with Python.

from math import sqrt

class Path:
    def __init__(self, points=[]):
        self.lens = []
        self.points = []
        self.normalized = False

        [self.AddPoint(p) for p in points]

        if len(self.points):
            self.Normalize()

    def __len__(self):
        return len(self.points)

    def AddPoint(self, point):
        self.points.append(point)

        if len(self.lens):
            l = self.Distance(self.points[-2], self.points[-1])
            self.lens.append(self.lens[-1] + l)
        else:
            self.lens.append(0)

    def Distance(self, a, b):
        return sqrt(sum([pow(a[i] - b[i], 2) for i in range(len(a))]))

    def DistancePath(self, path):
        if len(self) == len(path):
            return sum(self.Distance(self.points[i], path.points[i]) for i in range(len(self)))

    def Interpolate(self, array, index, ratio):
        return float(array[index]) + float(array[index + 1] - array[index]) * ratio

    def Normalize(self):
        if not self.normalized:
            self.normalized = True

            normLen = 10
            newPoints = []
            len = self.lens[-1]

            mx_min = min([x for x, y in self.points])
            mx_max = max([x for x, y in self.points])
            my_min = min([y for x, y in self.points])
            my_max = max([y for x, y in self.points])
            mx_diff = mx_max - mx_min
            my_diff = my_max - my_min

            if my_diff == 0:
                proportion = 10000000000000.0
            else:
                proportion = abs(float(mx_max - mx_min) / float(my_max - my_min))

            curIndex = 0
            for i in range(normLen):
                targetLen = i * len / normLen;

                while (self.lens[curIndex+1] < targetLen):
                    curIndex += 1

                ratio = (targetLen - self.lens[curIndex]) / (self.lens[curIndex + 1] - self.lens[curIndex])
                x = self.Interpolate([px for px, py in self.points], curIndex, ratio)
                y = self.Interpolate([py for px, py in self.points], curIndex, ratio)

                if (proportion < 0.2):
                    newPoints.append((0, (y - my_min) / (my_diff)))
                elif (proportion > 5):
                    newPoints.append(((x - mx_min) / (mx_diff), 0))
                else:
                    newPoints.append(((x - mx_min) / (mx_diff), (y - my_min) / my_diff))

            self.points = newPoints

    def PosValue(self, x, y):
        if (x < 0.5 and y < 0.5):
            return locals.StartTopLeft
        if (x >= 0.5 and y < 0.5):
            return locals.StartTopRight
        if (x < 0.5 and y >= 0.5):
            return locals.StartBottomLeft
        if (x >= 0.5 and y >= 0.5):
            return locals.StartBottomRight

    def MatchConstraint(self, c):
        if not c:
            return True
        if not self.normalized:
            return False

        startValue = self.PosValue(self.points[0][0], self.points[0][1])
        endValue = self.PosValue(self.points[-1][0], self.points[-1][1]) << 4

        return ((startValue | endValue) & (~c)) == 0

As you can see, the core algorithm requires that all paths are 'normalized' so that they contain the normLen number of points describing the generalised shape of the path. The Euclidean distance from each descriptive point to the corresponding point in each of a library of potential lines is then compared, and the line with the closest match is likely to be the line that the user was trying to draw. If you want more complex lines you could increase the number in normLen, but it should be fine for most letter/gesture detecting activities using hand-drawn lines.

The next piece of the puzzle is the following 'locals' class which holds a bunch of static variables and a default simplistic alphabet of gestures that correspond to letters of the alphabet. This is a rough approximation of the Palm 'Graffiti' alphabet:

class locals:
    StartTopLeft = 1 # starting in the top left corner is allowed
    StartTopRight = 1 << 1
    StartBottomLeft = 1 << 2
    StartBottomRight = 1 << 3
    StartAny = StartTopLeft | StartTopRight | StartBottomLeft | StartBottomRight

    EndTopLeft = 1 << 4
    EndTopRight = 1 << 5
    EndBottomLeft = 1 << 6
    EndBottomRight = 1 << 7
    EndAny = EndTopLeft | EndTopRight | EndBottomLeft | EndBottomRight
    Any = StartAny | EndAny

    capitals = [
        ["A", Path(zip([0, 5, 10], [10, 0, 10])), StartBottomLeft | EndBottomRight],
        ["B", Path(zip([0, 0, 0, 3, 3, 0], [0, 10, 7, 7, 10, 10])), StartTopLeft | EndBottomLeft],
        ["C", Path(zip([10, 0, 0, 10], [0, 0, 10, 10])), StartTopRight | EndBottomRight],
        ["D", Path(zip([0, 0, 10, 10, 0], [10, 0, 0, 10, 10])), StartBottomLeft | EndBottomLeft],
        ["E", Path(zip([10, 0, 0, 3, 0, 0, 10], [0, 0, 5, 5, 5, 10, 10])), StartTopRight | EndBottomRight],
        ["F", Path(zip([10, 0, 0], [0, 0, 10])), StartTopRight | EndBottomLeft],
        ["G", Path(zip([10, 0, 0, 10, 10, 5], [0, 0, 10, 10, 5, 5])), StartTopRight | EndAny],
        ["H", Path(zip([0, 0, 0, 3, 3], [0, 10, 7, 7, 10])), StartTopLeft | EndBottomRight],
        ["I", Path(zip([5, 5], [0, 10])), StartTopLeft | EndBottomLeft],
        ["J", Path(zip([10, 10, 0], [0, 10, 10])), StartTopRight | EndBottomLeft | EndTopLeft],
        ["K", Path(zip([10, 0, 0, 10], [0, 10, 0, 10])), StartTopRight | EndBottomRight],
        ["L", Path(zip([0, 0, 10], [0, 10, 10])), StartTopLeft | EndBottomRight],
        ["M", Path(zip([0, 0, 5, 10, 10], [10, 0, 5, 0, 10])), StartBottomLeft | EndBottomRight],
        ["N", Path(zip([0, 0, 10, 10], [10, 0, 10, 0])), StartBottomLeft | EndTopRight],
        ["O", Path(zip([5, 0, 0, 10, 10, 5], [0, 0, 10, 10, 0, 0])), StartTopLeft | StartTopRight | EndTopLeft | EndTopRight],
        ["P", Path(zip([0, 0, 0, 10, 10, 0], [0, 10, 0, 0, 5, 5])), StartBottomLeft | EndAny],
        ["P2", Path(zip([0, 0, 10, 10, 0], [10, 0, 0, 5, 5])), StartBottomLeft | EndAny],
        ["Q", Path(zip([4, 0, 0, 4, 4], [0, 0, 4, 4, 7])), None],
        ["R", Path(zip([0, 0, 0, 10, 10, 0, 10], [0, 10, 0, 0, 5, 5, 10])), StartBottomLeft | EndAny],
        ["R2", Path(zip([0, 0, 10, 10, 0, 10], [10, 0, 0, 5, 5, 10])), StartBottomLeft | EndBottomRight],
        ["S", Path(zip([10, 0, 0, 10, 10, 0], [0, 2, 4, 6, 8, 10])), StartTopRight | EndBottomLeft],
        ["T", Path(zip([0, 8, 8], [0, 0, 10])), StartTopLeft | EndBottomRight],
        ["U", Path(zip([0, 5, 10], [0, 10, 0])), StartTopLeft | EndTopRight],
        ["U2", Path(zip([0, 0, 10, 10], [0, 10, 10, 0])), StartTopLeft | EndTopRight],
        ["V", Path(zip([10, 5, 0], [0, 10, 0])), StartTopLeft | EndTopRight],
        ["V2", Path(zip([0, 3, 6, 10], [0, 10, 0, 0])), StartTopLeft | EndTopRight],
        ["W", Path(zip([0, 0, 5, 10, 10], [0, 10, 5, 10, 0])), StartTopLeft | EndTopRight],
        ["X", Path(zip([0, 10, 10, 0], [10, 0, 10, 0])), StartBottomLeft | EndTopLeft],
        ["Y", Path(zip([0, 0, 5, 5, 5, 5, 5, 10], [0, 5, 5, 0, 5, 10, 5, 5])), StartTopLeft | EndAny],
        ["Z", Path(zip([0, 10, 0, 10], [0, 0, 10, 10])), StartTopLeft | EndBottomRight],
    ]

Finally, the algorithm which executes the stroke by stroke, point by point search is implemented in Python in the following class:

class OneStrokeGestureException(Exception):
    pass

class OneStrokeGesture:
    """
        Can detect single-stroke pen gestures.
        Pass in the strokes variable to supply your own strokes to be recognised.

        Adapted by Chris McCormick <chris@mccormick.cx> from the Javascript code at:
        http://blog.monstuff.com/archives/images/JS-graffiti.html
    """
    paths = []

    def __init__(self, strokes=locals.capitals):
        self.strokes = strokes
        self.path = None
        self.down = False

    def PenDown(self, pos):
        self.path = Path()
        self.path.AddPoint(pos)
        self.down = True

    def PenTo(self, pos):
        self.path.AddPoint(pos)

    def PenUp(self, pos):
        self.down = False
        if len(self.path) > 1:
            self.path.AddPoint(pos)
            return self.FindBestMatch()

    def Learn(self, id, points):
        self.strokes += [[id, Path(points), locals.Any]]

    def FindGesture(self, points):
        self.path = Path(points)
        return self.FindBestMatch()

    def FindBestMatch(self):
        if self.path.points[0] != self.path.points[1]:
            self.path.Normalize()
            minDist = 100
            minStroke = [None, None, None]
            results = [(s[0], self.path.DistancePath(s[1])) for s in self.strokes if self.path.MatchConstraint(s[2])]
            results.sort(lambda a,b: cmp(a[1], b[1]))
            return results
        else:
            raise OneStrokeGestureException("Paths are different lengths")

This module will return a list of tuples of the names of all of the paths that match, and how closely they were matched. Generally, the first item matched will be the one you're looking for. You run the detection algorithm on the line that the user has created using FindGesture and passing in the list of points which make up the line. You can also call the PenDown, PenTo, and PenUp methods to have the class build the path itself incrementally as the user draws a line.

Together the above classes make up the gesture recognition code. Paste them into a file called OneStrokeGesture.py and then you are ready to begin detecting gestures. Here is a bit of test code which uses the Pygame library to help you try out the gesture recognition against the Graffiti alphabet of drawn symbols:

from OneStrokeGesture import OneStrokeGesture
import sys, pygame

pygame.init()

screen = pygame.display.set_mode((320, 240))
g = OneStrokeGesture()
paths = []

while True:
    for event in pygame.event.get():
        if event.type == pygame.QUIT:
            sys.exit()

        if event.type == pygame.MOUSEBUTTONDOWN:
            g.PenDown(event.pos)
            paths.append(g.path.points)
        if event.type == pygame.MOUSEMOTION:
            if g.down:
                g.PenTo(event.pos)
        if event.type == pygame.MOUSEBUTTONUP:
            print g.PenUp(event.pos)

    screen.fill([255, 255, 255])
    [pygame.draw.aalines(screen, [0, 0, 0], False, p, 1) for p in paths if len(p) > 1]
    pygame.display.flip()

I added the method Learn, which allows you to take existing paths drawn by the user and add them to the library of known paths. I have found this to be really effective. The algorithm finds already-learned paths with a high degree of accuracy - much higher in some cases than the preset Graffiti alphabet. This next bit of test code makes you teach five letters (a, b, c, d, e) three times before starting the recognition process. You'll want to run this on the command line as this test will print out the letter it wants to learn next. Once all letters are learned, the demo goes into recognition mode and you can freely draw strokes which will be detected against those that you input earlier.

import sys, pygame
from random import shuffle

from OneStrokeGesture import OneStrokeGesture

pygame.init()

screen = pygame.display.set_mode((320, 240))
paths = []
letters = [chr(c) for c in range (ord('a'), ord('f'))] * 3
g = OneStrokeGesture([])
print g.strokes

print "learning:", letters[0]

while True:
    for event in pygame.event.get():
        if event.type == pygame.QUIT:
            sys.exit()

        if event.type == pygame.MOUSEBUTTONDOWN:
            g.PenDown(event.pos)
            paths.append(g.path.points)
        if event.type == pygame.MOUSEMOTION:
            if g.down:
                g.PenTo(event.pos)
        if event.type == pygame.MOUSEBUTTONUP:
            if len(letters):
                g.Learn(letters[0], g.path.points)
                letters = letters[1:]
                if len(letters):
                    print "learning:", letters[0]
                g.PenUp(event.pos)
            else:
                print "found:", g.PenUp(event.pos)

    screen.fill([255, 255, 255])
    [pygame.draw.aalines(screen, [0, 0, 0], False, p, 1) for p in paths if len(p) > 1]
    pygame.display.flip()

Have fun!